As a manufacturer of rolling mills, Fuhr is constantly being challenged by increasing demands on the finished wire’s geometric precision. Accuracies of class 6 according to ISO 386 are almost standard. This implies a permissible deviation of ±0.0030mm for small profile wires with a nominal diameter of up to 3mm. If a process capability (Cp or Cpk) is also required, a spread of only ±0.0015mm remains in production.
In order to ensure that these requirements are met in daily production, the wire must be continuously measured whilst exiting the rolling mill, and the roll positions must be adjusted fully automatically. In multi-stage rolling processes it is necessary to measure and calibrate right after the pre-rolling stages. Therefore, modern high-speed rolling mills made by Fuhr are equipped with several measuring systems.
Conventional laser shadow measurement systems, as typically used in drawing round wires, have not proven to be successful in profiling lines. On the one hand, even a slight tilting of the wire changes the size of the shadow. On the other hand, laser systems cannot be used permanently in the wet area of the pre-rolling stages.

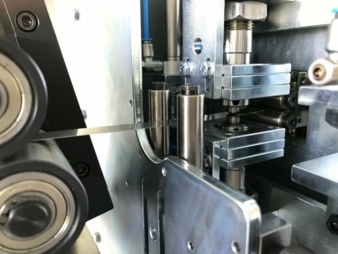
In multi-stage rolling processes it is necessary to measure and calibrate right after the pre-rolling stages. © Fuhr
Tactile measuring system
Fuhr therefore relies on tactile measuring systems, in which the wire is scanned with diamond-studded, high-resolution displacement measuring systems. Alternatively, instead of diamond styli, stylus rollers especially adapted to the wire geometry are available.
These measuring systems have been developed and built by Fuhr for several years. They are characterised by precision, robustness and a particularly good value-for-money. As a result, it is now possible and common practice to integrate more than just one of these systems into a rolling mill.
Data acquisition and evaluation system “F-MAS”
By the end of 2019, Fuhr has brought its data acquisition and evaluation system “F-MAS” to market maturity. With F-MAS, two wire dimensions (e.g. width and thickness of a rectangular profile) are measured with a measuring frequency of 1,000Hz. This real data is displayed in diagrams, statistical values are calculated, and frequency distributions are displayed. Reports are generated and raw data is exported. Integration into customer networks is a matter. of course. Data export to standard data analysis software is possible via an OPC-UA interface. Also integrated is an FFT analysis, which detects cyclical dimensional fluctuations and provides the opportunity of preventive maintenance.
Latest version “F-MAS 5.0”
The latest version “F-MAS 5.0” now integrates a measurement system analysis (MSA) according to Type 1 study. Different calculation methods such as “MSA3”, “MSA4” and “VDA5” can be selected. Thanks to the integrated analysis, the system operator can provide the regular proof of test process capability required as part of his quality management system directly in the machine without using special software. A test protocol is created automatically.
Additionally, the measuring uncertainty of the measuring system according to “GUM” is also determined within the scope of the MSA and, if desired, displayed in the diagrams on the screen and in the protocols as a range of uncertainty. For the operator it is clearly visible which dimensional range the wire has to be produced in order to comply with the specified tolerances.
Source: Wire Draht www.umformtechnik.net
Copyright © 2019-2021 SECRI and China Wire & Cable Network All Rights Reserved. Record No:沪ICP备05040613号-7